
You might be interested to know that Marc has a book that's coming out in October -
The Urban Sketcher: Techniques for Seeing and Drawing on Location
You can pre-order his book on Amazon by clicking on the link.Step-by-Step Drawing Example : Davis House Dot Plot
The other day I showed you a quick example of what I’m calling ‘Dot Plots’. I really need a better name for this. Maybe somebody who isn't such an autodidact can tell me what it's called? I came up with this on my own, but there is probably an official name for this trick.
Anyway - I was out sketching the other day, and got another good example. Here's the step-by-step shots:

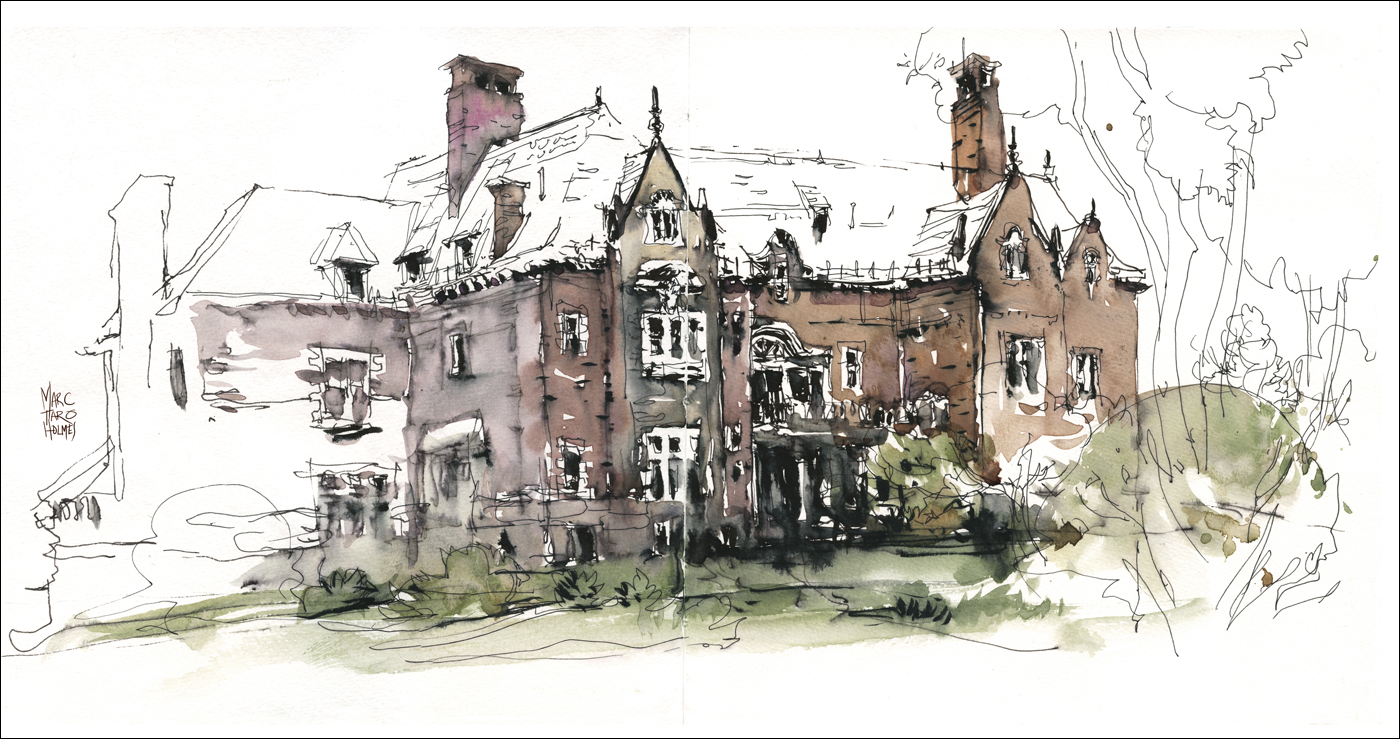
This is the first pass of the Dot Plot.
What I have here are a set of small dots and dashes that describe for me the roof line of my subject, and where the ground line falls. The two major perspective angles I need to know in order to fill in the ‘face’ of the building.
It’s just a matter of putting in a small mark wherever there is a corner or intersection. The peak of each cupola, the width of each column of windows. You can stop whenever you have enough measurements to see the silhouette. Once you've got the ‘box’, you can just pile the details inside.


Ta da! See how the building appears, simply by connecting the dots? This is what they mean when they say ‘work larger to smaller’.
It might be easier for beginners to do this in pencil. You can poke in a few of these tiny markers, and if a quick sight measuring check says they’re wrong you only have to erase a few dots, not a whole drawing. When I'm doing it like this in ink, if I mis-place one, I just ignore it, and put another in the right place. At the end of the drawing, you don't notice any stray marks.
I talk a fair bit about sight measuring in my upcoming book on sketching. (Sorry, sorry, relentless promotion. Baby needs a new pair of shoes). But, even while doing so, I try to give you the techniques to escape measuring as quickly as possible.
My philosophy is, learn to make measuring instinctive. It really should not become labor. That sucks all the fun out it. I don’t think anyone enjoys the measuring part of sketch. We’re in it for the excitement of the rapid scribble! The lightning fast impression. The measuring is only so we’re not disappointed later, coming home with an out of proportion sketch, or a drawing that's crammed into the corner of our page.

Personally, I’m aiming for the best of both worlds. A way to get just enough accuracy to keep my left brain happy, but to go fast enough to keep my right brain engaged.


By the way, this is Davis House. It’s in is in a great location on De La Montaigne where you can sketch five small buildings surrounding a cute little park. A real oasis for sketchers. If you’re ever in Montreal, and find yourself near McGill, you might like this spot. (MAP).